
How to Clean Mother of Pearl Wall Art: Care Guide

Table of Contents
- Identifying Mother of Pearl Wall Art and Its Construction
- How to Dust Mother-of-Pearl Wall Art Safely
- Cleaning Mother-of-Pearl Without Damaging It: Step-by-Step
- What Not to Use on Mother of Pearl
- How to Remove Fingerprints from Mother-of-Pearl Inlay
- Protecting the Iridescent Surface and Managing Stains
- Cleaning Frequency and Ongoing Maintenance
- When to Stop and Consult a Conservator
- Frequently Asked Questions
Last Updated: October 6, 2026
Identifying Mother of Pearl Wall Art and Its Construction
Mother of pearl wall art is a decorative piece made from thin slices of nacre, the iridescent layer found inside certain shells, set into a base of wood, resin, or stone. At Mahlia Interiors, we handcraft each piece using genuine shell inlay, so we know exactly how delicate that surface can be. The nacre sits slightly proud of the base, which is what gives the piece its shimmer and its vulnerability. Before you clean anything, work out what you are dealing with. Run your fingertips along the edge. Mother of pearl feels cool and smooth, like glass, while bone inlay feels warmer and more matte. Check the backing too. Many wall pieces use a wood panel behind the decorative surface, and some are finished with tempered glass over the top. That construction detail changes how you clean it. A glass-covered piece takes a damp cloth easily. An exposed shell surface needs a far gentler touch.

- Genuine shell inlay: cool, smooth, iridescent, and fragile
- Bone inlay: warmer tone, matte finish, slightly more forgiving
- Wood panels: common backing, never soak them
- Tempered glass: protects the shell, but only if it is actually there
How to Dust Mother-of-Pearl Wall Art Safely
Dust removal is the single most important part of mother of pearl wall art care, and it is also where most damage happens. The fix is simple: use a soft brush, not a cloth, for the first pass. A hake brush or a clean makeup brush lifts dust off the surface without dragging grit across it. Grit is the enemy here. A dry cloth pressed onto a dusty shell surface works like fine sandpaper.
Work from top to bottom so dust falls away from the areas you have already cleaned. Use light, flicking strokes. Do not press down. Once the loose dust is gone, you can follow with a dry microfibre cloth, but only with almost no pressure at all.
- Soft brush first: hake brush, makeup brush, or a clean paintbrush
- Dry microfibre cloth second, feather-light
- Top to bottom, always
- Never rub in circles on an inlay surface
Dust fortnightly in most rooms. In a kitchen or near an open window, weekly is better.
Cleaning Mother-of-Pearl Without Damaging It: Step-by-Step
Cleaning mother-of-pearl without damaging it comes down to one rule: the least water and the least pressure that gets the job done. Shell is porous in places and the iridescent layer can lift, cloud, or scratch if you push too hard. Here is the process we recommend to anyone caring for an inlay piece.
- Dust first. Brush the whole surface with a soft brush. Never skip this step.
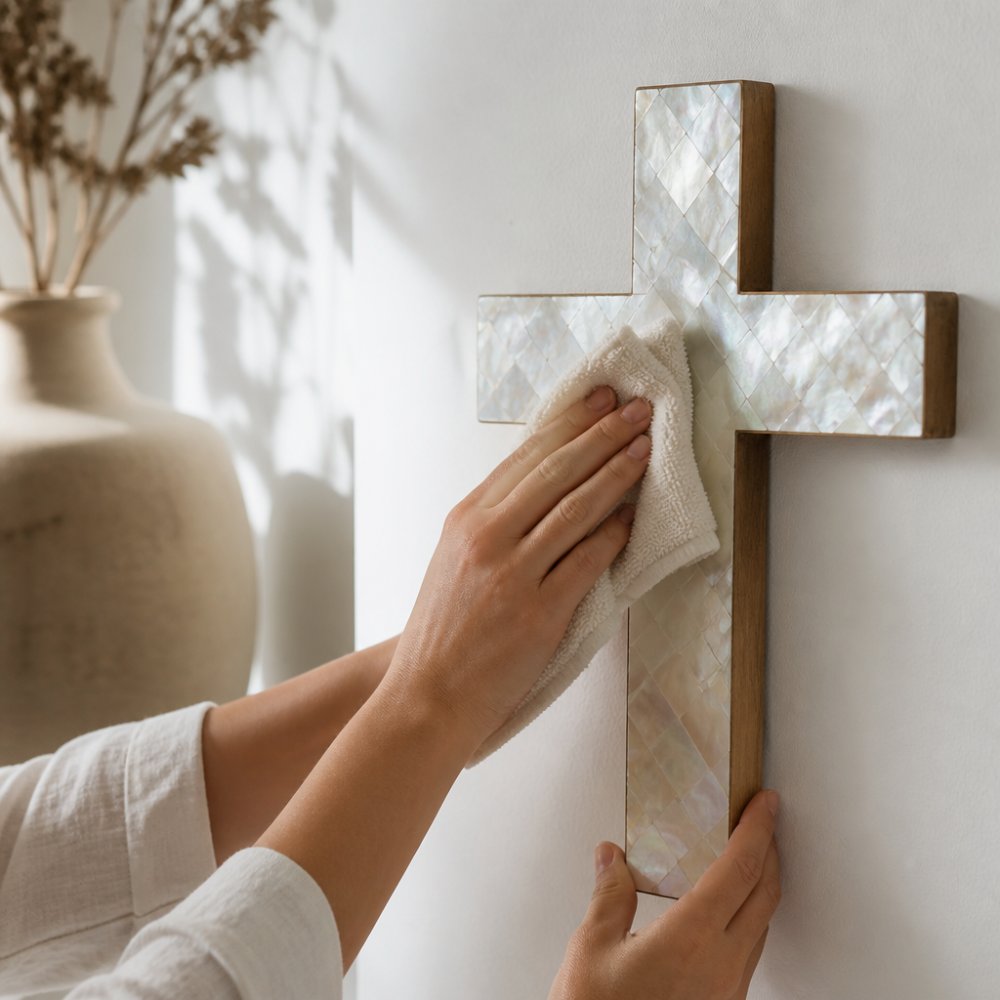
- Mix a barely-damp cloth. Use a microfibre cloth wrung out until it is almost dry. Warm water only.
- Wipe one small area at a time. Use gentle, straight strokes. Follow the grain of the inlay pattern.
- Rinse the cloth often. A dirty cloth just moves grime around.
- Stop the moment the cloth picks up colour. That means you are lifting finish, not dirt.
Drying and Moisture Control
Dry the surface immediately with a separate dry cloth. Do not let water sit, and do not let it run into the joins between shell pieces. Moisture is what causes wood panels to swell and inlay to lift. In humid rooms, run a dehumidifier nearby and keep the piece off damp external walls.
Troubleshooting Common Problems
Even with careful technique, you may run into stubborn marks or unexpected reactions. Here is how to handle the most common issues without making them worse.
If the cloth picks up colour: Stop immediately. That colour is likely finish or pigment from the shell itself, not dirt. Do not continue wiping. Let the area dry completely and assess. If the colour loss is significant, consult a conservator.
If a mark won't lift with water: Do not escalate to stronger cleaners. Instead, try a dry cotton swab to gently work at the edge of the mark. If it still won't budge, it may be a stain that has penetrated the porous shell.
If the surface feels gritty after cleaning: You may have dragged dust into the shell. Re-dust with a soft brush using light, flicking strokes. Avoid pressing down, which embeds grit further.
If the iridescence looks dull: This can happen if a film of soap or hard water minerals remains. Wipe again with a cloth dampened with distilled water, then dry immediately. Do not use vinegar or commercial descalers.
If you notice a white haze: This is often moisture trapped under the surface. Stop cleaning, increase ventilation in the room, and let the piece dry naturally for several days. Do not use heat to speed it up.
- Cloth picks up colour: stop, dry, assess
- Mark won't lift: try dry swab, then stop
- Gritty feel: re-dust gently
- Dull iridescence: distilled water wipe
- White haze: improve ventilation, wait
What Not to Use on Mother of Pearl
What not to use on mother of pearl matters more than what you do use. Harsh chemicals, abrasive materials, and aggressive cleaners all attack the iridescent layer directly. The nacre is soft. Anything designed to scrub will scratch it, and anything acidic or alkaline will etch it.
Avoid these entirely:
- Glass cleaner, ammonia, bleach, and vinegar
- Cream cleansers and abrasive powders
- Steel wool, scouring pads, and stiff brushes
- Solvents, alcohol, and furniture polish with silicone
- Ultrasonic cleaners, which can crack thin shell
Even "gentle" all-purpose sprays leave a film that dulls the shimmer. Plain water and a soft cloth do the job. If you need more than water, that is a sign the mark is not ordinary grime, and you should read the next section before you try anything stronger.
How to Remove Fingerprints from Mother-of-Pearl Inlay
Removing fingerprints from mother-of-pearl inlay is easier than most people expect, because the mark usually sits on the surface rather than in it. Breathe lightly on the area to create a little condensation, then wipe with a dry microfibre cloth using a single soft stroke. That handles most prints.
For greasier marks, dampen a corner of the cloth with warm water and a trace of mild dish soap. Wipe gently, then go over the area again with a clean damp cloth to remove any residue. Dry straight away. Never scrub at a fingerprint. Rubbing spreads the oil and pushes it into the joins.
Mother of Pearl Small Cross : Floral : White →
- Light print: breath and a dry cloth
- Greasy print: trace of mild soap, then rinse and dry
- Stubborn residue: stop and seek advice
Protecting the Iridescent Surface and Managing Stains
Protecting the iridescent surface is mostly about prevention, because once a stain sets into porous shell it is very hard to shift. The nacre layer is thin and sensitive to both physical and environmental stress.
Sunlight and heat: Ultraviolet light breaks down the organic proteins that give nacre its shimmer, causing it to fade and become brittle over time.
Humidity and moisture: Shell is porous and expands and contracts with moisture changes. High humidity can cause the wood backing to swell, pushing the inlay out of alignment. Low humidity can dry the shell and lead to cracking.
Physical impact: The shell sits slightly proud of the base, making it vulnerable to knocks. Avoid stacking or leaning items against the surface. When moving the piece, support it from the back and edges, not the face.
Cooking splatter and aerosols: Grease and airborne particles from cooking can settle on the surface and dull the shimmer. Aerosol sprays, including air fresheners and hairspray, can leave a sticky film that attracts dust.
Stain management: Act fast but gently. Blot, never rub. A fresh mark often lifts with a barely-damp cloth. An older stain that has soaked in should not be attacked with stronger products, as you risk taking the finish with it.
- Keep out of direct sun and away from heat sources
- Maintain stable humidity between 40% and 60%
- Blot spills immediately, never rub
- Do not stack or lean items against the surface
- Support the piece properly when moving it
Cleaning Frequency and Ongoing Maintenance
A light dust fortnightly, a damp wipe every two to three months, and an immediate response to marks keeps most pieces in good order. Rooms with more dust, humidity, or traffic need more attention. A coastal home or a humid climate calls for shorter intervals and closer watching for any lifting at the edges.
Set a simple routine:
- Weekly: check for new marks and dust build-up
- Fortnightly: soft brush dust
- Quarterly: barely-damp wipe and dry
- Yearly: check the backing and joins for movement
Handle the piece as little as possible. Most damage we see comes from handling, not from cleaning.
When to Stop and Consult a Conservator
Stop cleaning and call a conservator if the shell is lifting, cracking, or flaking, if the surface has clouded and will not clear, or if a stain has soaked into the base material. These are not cleaning problems, and no cloth will fix them. A professional conservator can stabilise lifting inlay and treat stains without destroying the finish. Attempting it yourself usually makes it worse.
If your piece is a Mahlia Interiors design, such as our Mother of Pearl Small Cross in Floral White, we are always happy to talk you through the right approach for that specific construction before you touch it.
Frequently Asked Questions
How do you clean mother-of-pearl wall art?
Start by dusting with a soft brush or microfibre cloth. For a deeper clean, dampen a separate microfibre cloth with water, wring it out until barely wet, and wipe the surface gently. Dry immediately with a clean, dry cloth. Avoid soaking the piece, and never use vinegar, ammonia or abrasive cleaners. Clean gently in sections rather than scrubbing, and always support the artwork flat if you remove it from the wall.
Can you use water to clean mother-of-pearl inlay?
Yes, but only a slightly damp cloth. Mother of pearl is porous, so excess water can seep behind the inlay and weaken the bond to the base. Wring the cloth out thoroughly so it feels almost dry, wipe the surface once, then buff with a dry cloth. Do not spray water directly onto the artwork, and never submerge it. For stubborn marks, dampen a cotton swab and work only on the affected area.
What should you use to dust mother-of-pearl wall art?
A soft brush such as a hake brush or a clean microfibre cloth works best. These lift dust without scratching the iridescent layer. Brush downward with light pressure, working from the top of the piece to the bottom so dust falls away rather than settling back. For intricate inlay patterns, a soft-bristled brush reaches into the grooves where a cloth cannot. Avoid feather dusters, which can drag grit across the surface.
When should you ask a professional to clean or restore mother-of-pearl art?
Contact a conservator if you notice lifting or missing inlay pieces, deep staining that does not respond to gentle cleaning, cloudiness under the shell surface, or cracks in the base material. These problems usually need specialist adhesives and techniques that are not available off the shelf. Attempting repairs yourself can cause further damage. For pieces with sentimental or significant value, a professional assessment is worth the cost before any cleaning attempt.
Caring for shell inlay takes patience, and the wrong cloth can undo years of craftsmanship in seconds. Mahlia Interiors handcrafts every piece using genuine, ethically sourced mother of pearl, so we know how much the surface deserves careful handling. Our pieces are individually made by skilled artisans, and our custom inlay design service lets you create something built around your space. Shop our new arrivals and bring a piece home that rewards a little gentle care.